Many of you are familiar with my enthusiasm (some even mock it as an obsession) for cultivating and ripening a Christmas tomato. In Melbourne this is relatively easy, but I’ve also managed it in my first three years of growing food here in Kyneton.
Part of my approach to growing Christmas tomatoes involves making an early start with my seeds. I’ve had the good fortune to have propagated plants in many different greenhouses over the years, from big ones to small ones. The bigger the greenhouse, the better it holds a warm temperature consistently, and the faster your seedlings will grow. Seeds may take days or even weeks longer to germinate in a small greenhouse than they will in a large one.
I have two greenhouses in my garden. Trying to germinate tomato seeds in either of them in winter is a waste of time. The winter temperatures are too cold and germination is delayed by weeks or even months. Instead, I’ve always used the simple method of an opaque plastic tub placed next to the fire place. It has worked well for me over the years. The main issue when the kids were very young was interference, but they’re respectful of the seedlings now.
Read about my attempts to grow a Christmas Tomato without a greenhouse or any other fancy equipment here.
Is a seed starter heat mat worth it?
Some gardeners swear by using propagating heat mats and have encouraged me to try them. This year, I bowed to peer pressure in the interests of experimentation. I found some interesting results and have included the results of my experiments here to help you decide if purchasing a heat mat is worth it in your situation.
Ryset heat mat review
The large Ryset heat mat can easily accommodate a large number of pots at once. It’s waterproof and can be used indoors or in a greenhouse.
I purchased the Ryset Seed Starter Heat Mat (Large) from an online retailer. It’s the largest heat mat I could find using a quick Google search. Its dimensions are 50 cm x 120 cm. There are much larger options out there for commercial growers, but this domestic solution would certainly suffice for any backyard grower. Remember, the bigger the heat mat, the more energy required to operate it.
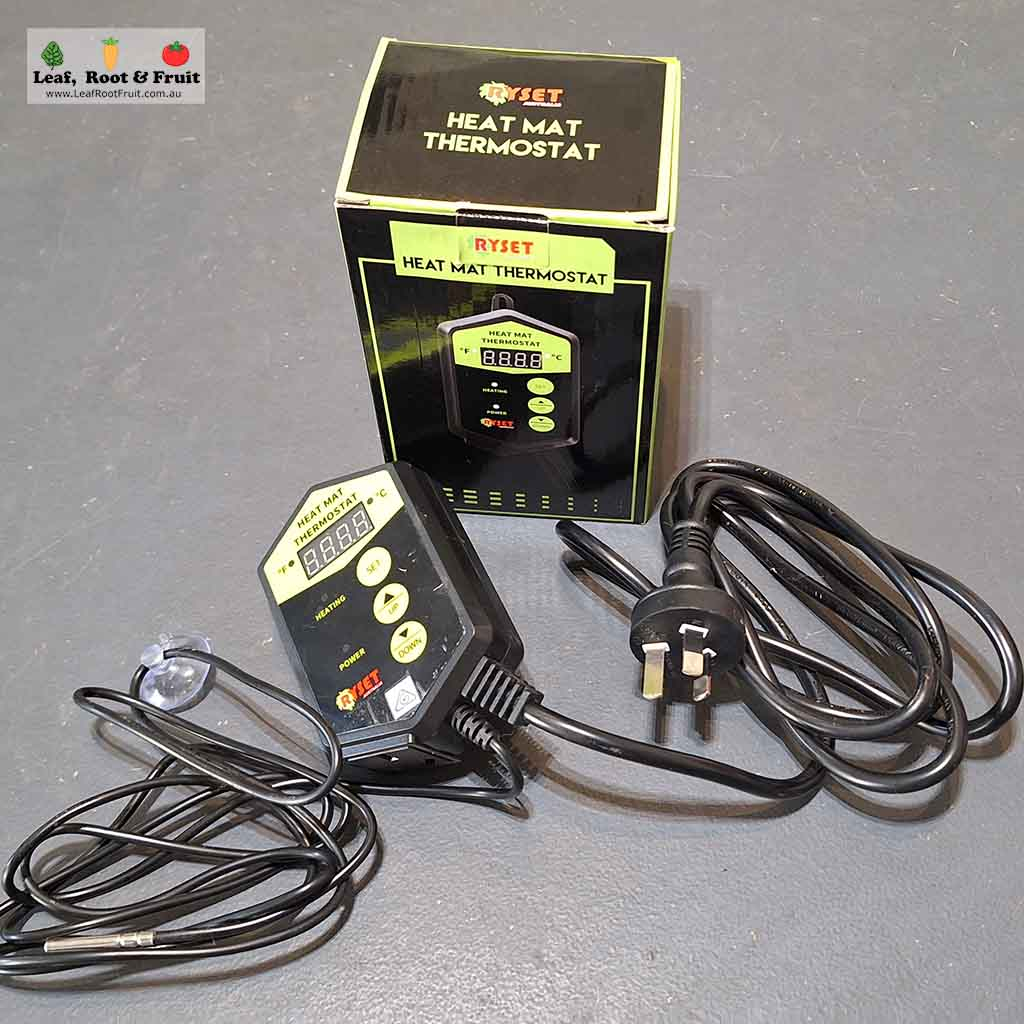
When placing my order I also ordered the Ryset Heat Mat Thermostat. It is not essential to use a thermostat with your heat mat, but it can help to regulate the temperature and reduce the energy the heat mat uses. It’s a pretty simple device.
The thermostat can be used with any brand of heat mat. It’s not essential but can save a bit of energy use.
To use the thermostat, you plug it into your power point and select the desired temperature (I set mine to 22 degrees C for all the experiments in this blog). The heat mat power plug is plugged into the thermostat. The thermostat has a temperature probe that you insert into the soil of one of your pots. The thermostat uses the soil temperature to turn the heat mat on or off accordingly.
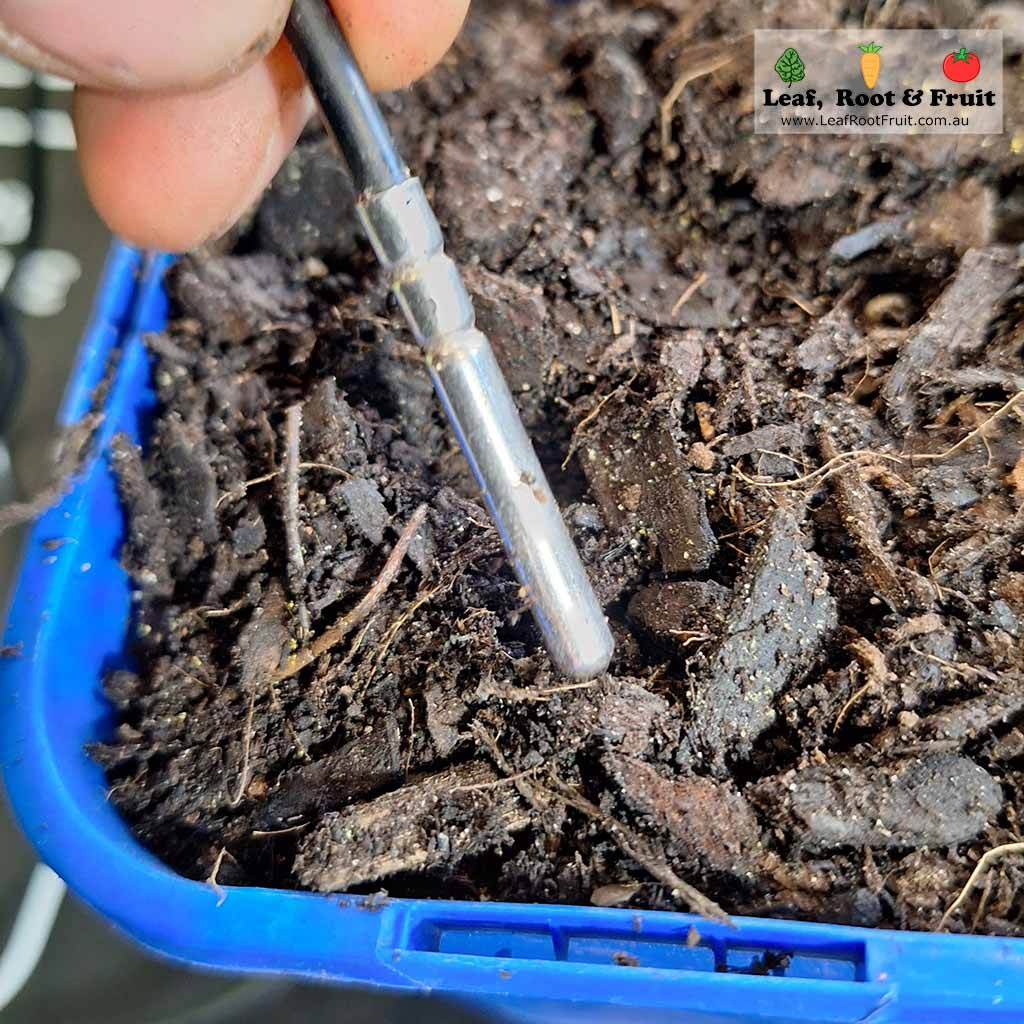
The soil probe is inserted into the potting mix to give an accurate recording of the soil temperature that the seeds are experiencing.
Keep in mind that temperature probe placement is important. The heat mat will heat the potting mix at the bottom of the pot more effectively than at the top. So placing the probe further down in the soil will probably cause the heat mat to operate less over the germination time frame.
Cost of purchasing the heat mat
I don’t accept commissions or free products for products that I trial. This ensures an unbiased approach for my readers. I paid full retail prices for the heat mat and thermostat as follows:
All up, the heat mat was simple to set up and seems straightforward to operate. It appears to be well made and weatherproof.
Setting up the tomato germination experiment
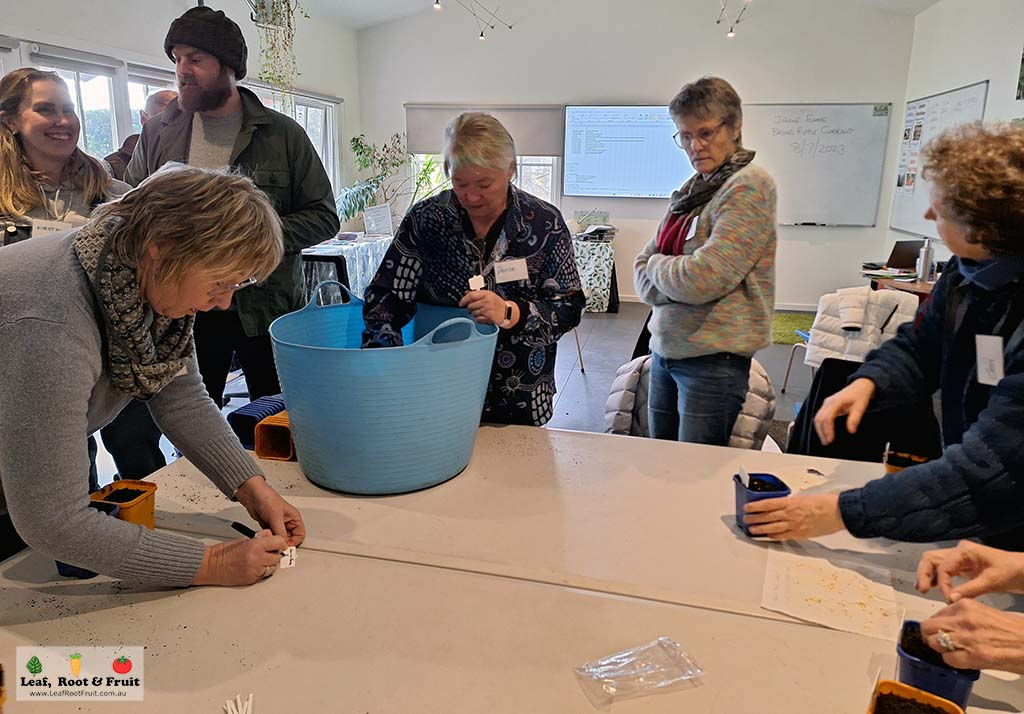
I run a workshop series called The Science of Edible Gardening, which consists of eight workshops that I run throughout the year. I like to conduct a practical activity to help the participants consolidate their learning at the end of each workshop.
Workshop participants each potted up some tomato seeds to take home and germinate. We compared the impact of their various microclimates on seed germination.
At my recent seasonality workshop the participants and I all potted up two different varieties of tomatoes. Participants took them home and placed them in an ideal location to promote germination. They then reported back via our private Facebook group to compare outcomes. There was a great variation in locations and microclimates as participants had come from all over Victoria.
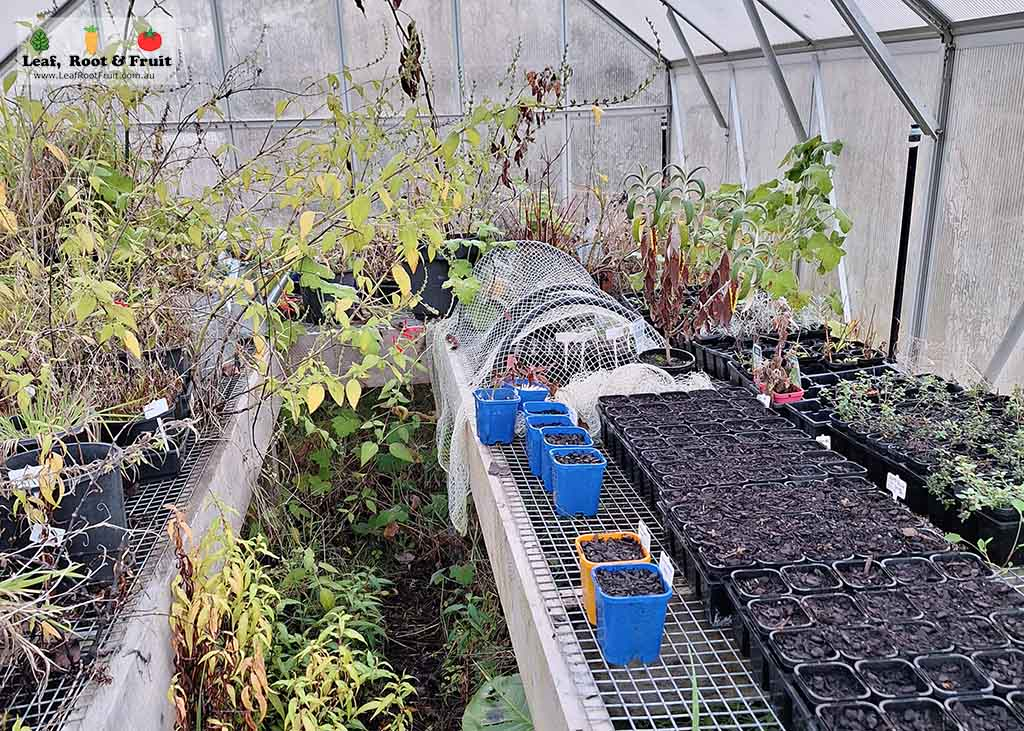
During this practical activity, we also potted up four extra sets of seedlings. I placed these sets in four locations on our property here in Kyneton.
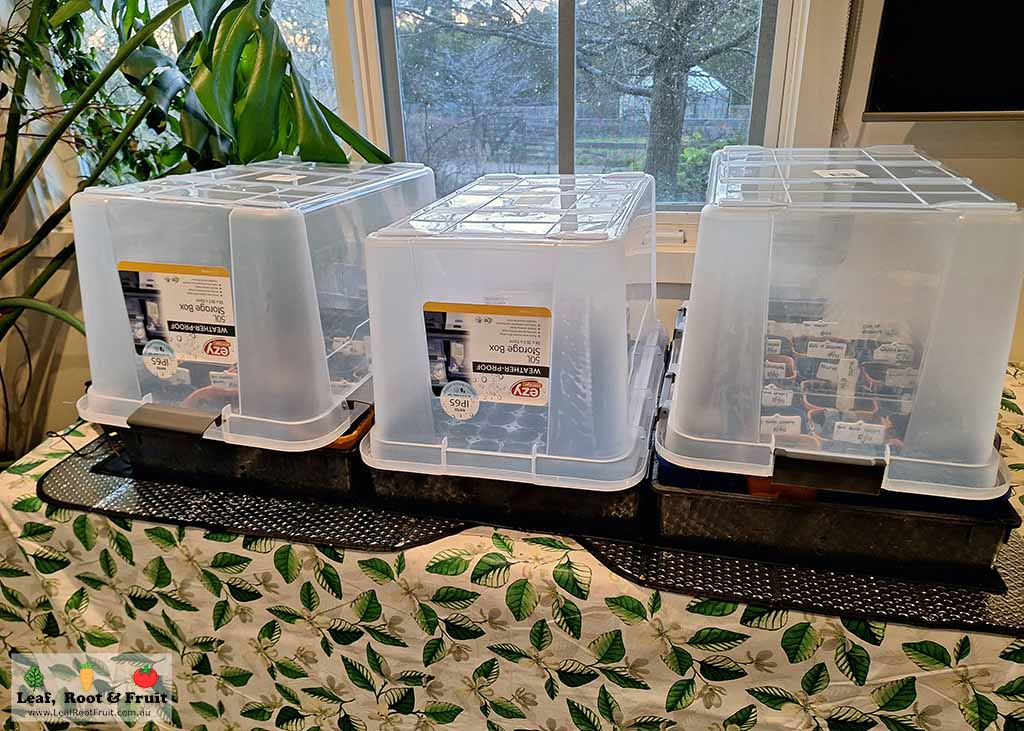
Location one: Opaque tub next to the fireplace
This is my traditional method of germinating tomato seeds. The tub was placed right next to the fireplace with the lid on.
A plastic tub that allows light to penetrate. Cheap, simple, and easy to store when not in use.
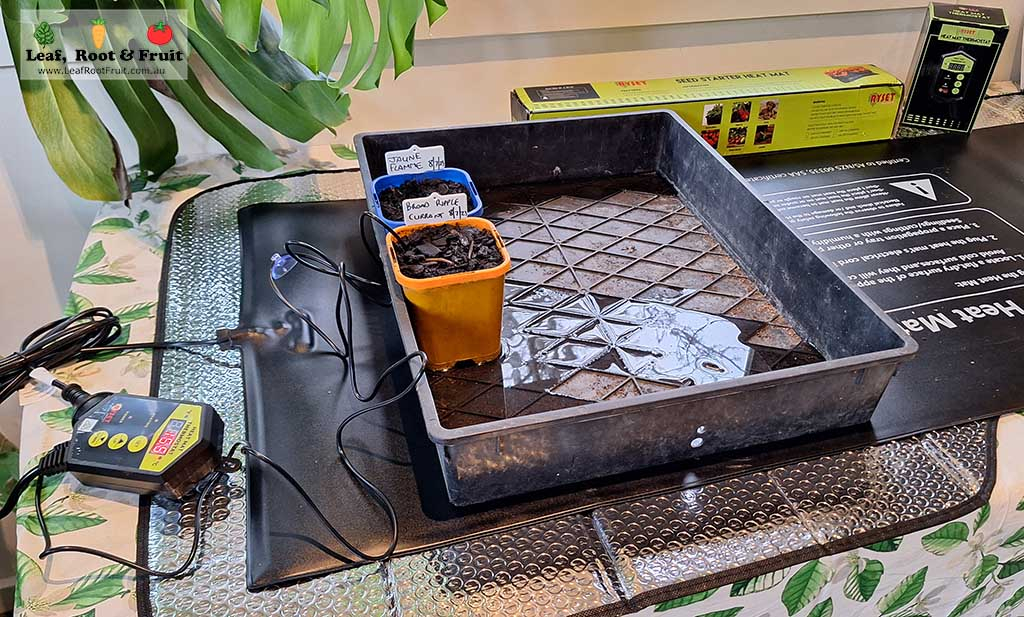
Location two: Propagating heat mat in our studio classroom
This set of seeds was placed on the heat mat set-up described earlier, in large black plant trays. Upended plastic tubs were placed over the top to help retain heat. The temperature probe was inserted about halfway down the soil in the pot.
The new seed starter heat mat in action. It’s a relatively expensive set-up, but also easily packed away when not required.
Location three: Polycarbonate greenhouse
I relocated this 435 cm x 295 cm corflute polycarbonate greenhouse with us when we transitioned from Melbourne to Kyneton. When I lived in Melbourne, I could easily start my tomato seeds in this polycarbonate greenhouse. They would germinate in around 7 to 10 days. It hasn’t been as effective since we relocated it to Kyneton. But in the last three years I have noticed this greenhouse is more efficient at germinating seedlings than location four, my glasshouse.
This corflute polycarbonate greenhouse was initially installed in my garden in Glen Iris, Melbourne. I relocated it when my family moved to Kyneton in 2019.
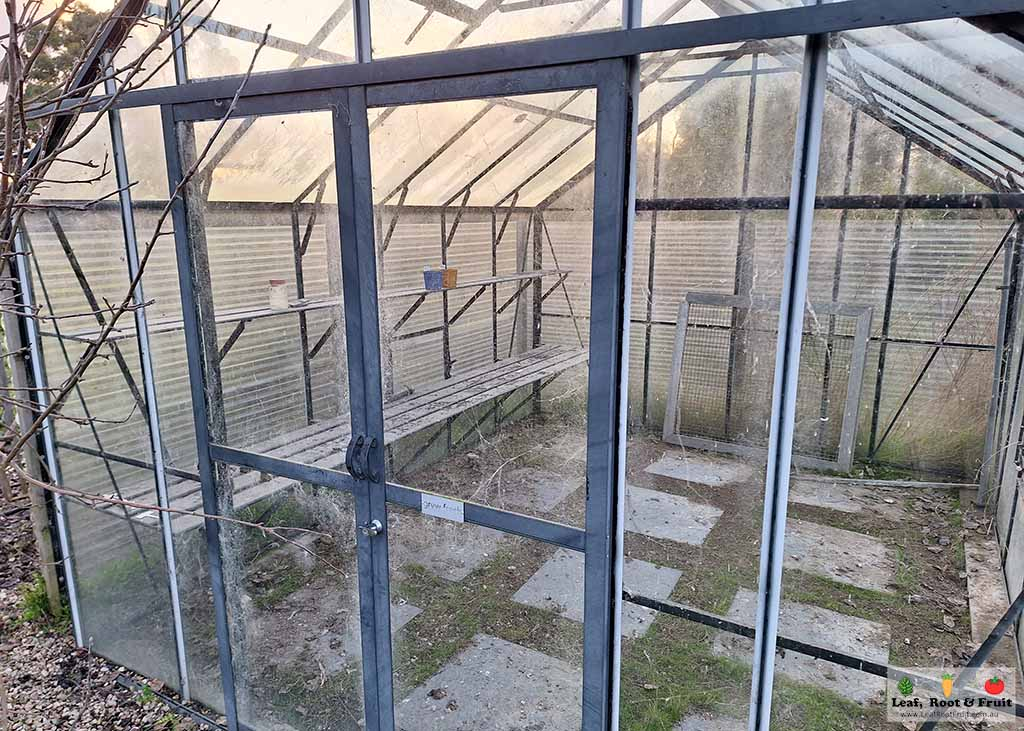
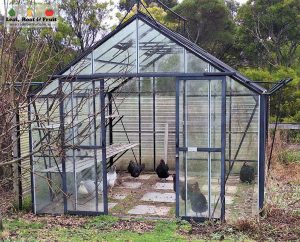
Location four: Glasshouse
This glasshouse was installed in our Kyneton garden by the previous owners. Its footprint is 315 cm x 380 cm and it looks much fancier than the polycarbonate greenhouse. It’s in a different location, which may influence the microclimate slightly, but I think that the glass is not as efficient as retaining heat as the corflute polycarbonate.
My glass house looks fancier than the polycarbonate version. However, experience has shown that the polycarbonate greenhouse is better at germinating seeds.
Results of the first germination trial
And the winner is! In this trial, the plastic tub placed next to the fireplace was the fastest method of germinating tomato seeds.
I checked in on the pots each day and recorded when the seedlings first emerged.
Translucent tub next to fireplace: 7 days to seedling emergence
Heat mat in classroom: 8 days to seedling emergence
Polycarbonate greenhouse: 30 days to seedling emergence
Glasshouse: 42 days to seedling emergence
At first glance, it would seem that my traditional method of using the translucent plastic tub next to the fireplace is the best method. It’s quicker AND (other than the cost of the tub) FREE. No extra electricity required.
As in other years, there was a huge delay in the germination of the seedlings in the polycarbonate greenhouse and an even bigger delay in the glasshouse. I tend to start my seeds indoors. Once they start showing signs of phototropism (bending towards the light) I transfer them to the greenhouse.
Seedlings start bending towards the light source, such as a window, as they grow. This is called phototropism. I like to move my seedlings to a different location with better access to light just as they start to bend, but before they hit this point.
When observing the seedlings germinating on the heat mat, I noticed that the seedlings towards the middle of the mat were the fastest to germinate. Pots placed on the perimeter were sometimes days slower to emerge.
During the trial it was clear that seedlings towards the middle of the heat mat emerged faster than those on the perimeter.
This started me wondering… could the heat mat be better optimised to improve germination? My thinking was that pots on the perimeter were losing heat faster than those in the middle. If I could reduce the amount of heat loss then I could potentially speed up germination even further. Time for a second experiment!
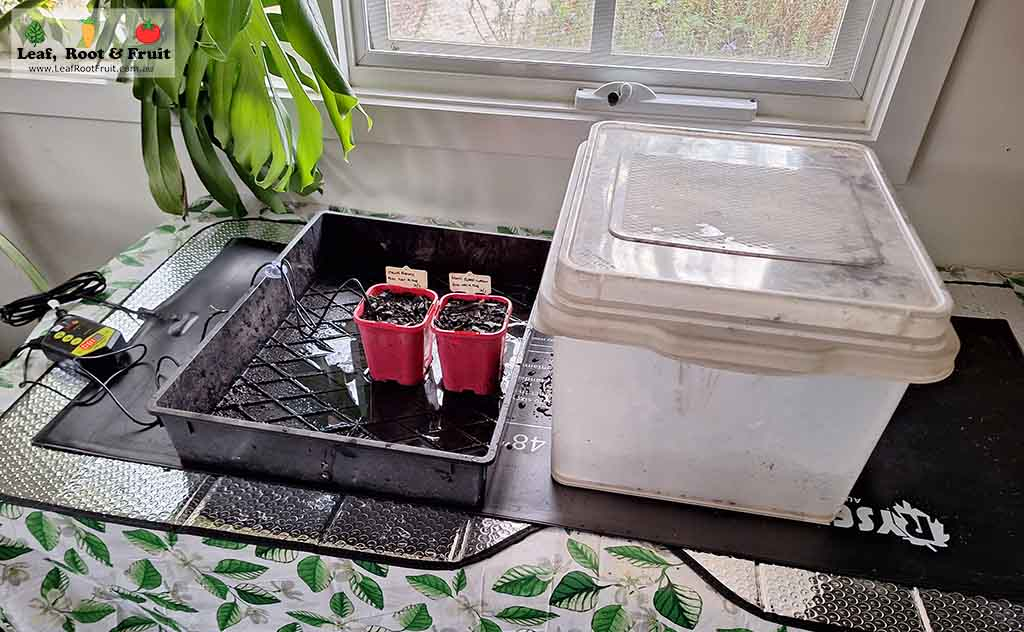
Second germination trial: Can use of the Seed Starter Heat Mat be optimised?
This was a pretty simple experiment to set up. I potted up the same set of seeds as for the first germination trial, on the same heat mat. On one half of the mat I placed the two pots in my translucent plastic tub with a lid. On the other half of the mat I placed the other two seedlings in a black seedling tray without a cover.
Germination trial number two, with the same sets of tomato seeds planted and set up on the propagation heat mat. One set was in an opaque plastic tub with a lid, the other was without a cover.
Results of the second germination trial
Again, I checked the pots daily and recorded when seedlings first emerged. This was a pretty straightforward outcome.
On heat mat without a cover: 13 days to seedling emergence
On heat mat inside translucent plastic tub with a lid: 6 days to seedling emergence
What’s clear is that if you are going to invest in a propagation heat mat, then you are best to also invest in some tubs or similar to help retain heat. When I initially set up the heat mat, I put a shiny silver windscreen protector underneath it to help direct the heat upwards into the pots. This also helps to increase energy efficiency.
Analysis of the energy use of the seed starter heat mat
My local library offers for loan sustainable house kits to help improve the energy efficiency of your house. After months on the waiting list, I was able to borrow the kit just before I set up the second germination trial.
There are some exciting pieces of equipment in the kit, including a thermal imaging camera. I had great fun with this in the garden. See this post for thermal images of chickens, hot compost, microclimates and more!
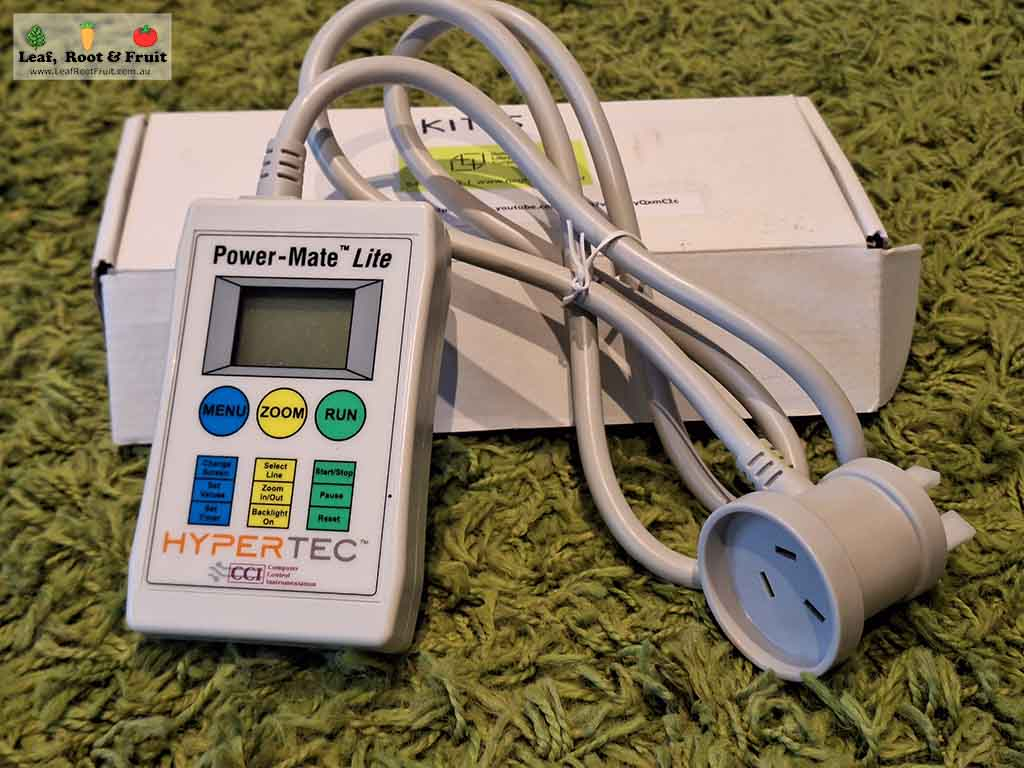
The kit also has a Power-Mate-Lite power meter. It lets you plug in any piece of 240v electrical equipment to determine the power use. This gave me the perfect opportunity to determine what kind of power usage and costs may be associated with running the heat mat.
The power meter is very simple to use. You plug it into the power point, and you plug the device to be tested into the meter. It shows power usage in real time, but can also be left to run over an extended period of time to measure the power use of devices that operate intermittently, such as fridges and freezers – and propagating heat mats!
You can even input the rate you pay for electricity and it will automatically calculate the actual cost to run the piece of equipment per day, week or year. You can find your rate on your electricity bill.
The Power Mate-Lite power meter is easy to use and can measure the power usage of most household appliances.
We have solar panels installed, so the cost for us will likely be nothing while the unit is operating during the day. There will be a cost at night, though.
To simplify things, I entered a nominal cost of $0.33 per kilowatt hour (kWh). I based this on a quick Google search to identify prices towards the upper end of a basic power plan. Using this guide will give a rough cost estimate for anyone using the heat mat without solar power inputs or other variables.
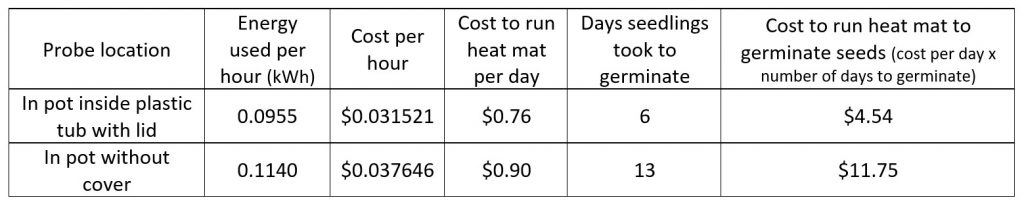
I used the power meter to determine the energy consumption over a whole day. I did this twice: once with the probe inserted into the soil of a pot inside the plastic tub, and again with the probe inserted into the soil of a pot without a cover.
Given the heat loss is probably greater in the uncovered pots, you would expect the thermostat to activate the heat mat more often when the probe is placed into the cooler soil. The probe was inserted into the uncovered pot for most of the duration of the second germination trial. Every time I checked the temperature on the thermostat, it was reading well below the set temperature of 22 degrees C. This meant that the heat mat was likely to be operating 100% of the time that the probe was inserted into the uncovered pot. This led to a big difference in power usage, depending on the probe placement.
Optimisation of germination (cover vs no cover) combined with energy use data compared with two different temperature probe placement (costing of power usage is based on paying $0.33 per kWh)
The second germination experiment shows that placing the seeds within a plastic tub or propagating unit makes a huge difference to the time that it takes for the seeds to germinate. Using a plastic tub will mean that less power is used per day because heat loss is reduced. Faster germination times mean fewer days of power are used, which means power usage and costs are substantially lower.
Germinating tomato seedlings: the final verdict
These trials show that different microclimates can have a huge influence on the germination times of your seedlings. There are lots of options for starting tomato and other vegetable seeds early. Many of them are expensive yet don’t provide a better return than cheaper options.
Whatever method you use, it’s the little details of how you set up and where you place your equipment that are important.
For me, I’ve already spent the money on the heat mat. When fully optimised with plastic tubs and powered by solar energy during the day it is relatively low cost to run. Using it will free up space around the loungeroom fireplace during July and keep the precious seedlings out of reach of children. So I’ll probably use it again in future years.
However, having analysed all this data, I probably wouldn’t bother to buy one if I hadn’t already. A plastic tub in a warm, and ideally sunny, spot will do just fine (more on that here).
Melbourne-based gardeners and others in a warmer climate can still consider using a greenhouse as a way to start their tomatoes and other vegetables. However, there are lots of reasons why you might choose different methods.
When installing a greenhouse is a good idea, and when it’s not
What to consider when buying a greenhouse
Greenhouse alternatives
Cloches and cold frames
While you are at it, check out my guide to making an early start with your spring vegetables. It discusses:
What types of seeds you can make an early start with
When to start sowing them
Our glasshouse in Kyneton. The chooks love it, but is it the best option for making an early start on the growing season? Head over to my Substack page to find out!
Excellent experiment and results. Just wondering if the “next to the fireplace” method would work with electric panel heater? Sadly I don’t have a fireplace in my current residence.
Very informative article. I’m based in Canberra, so cold climate also. We have underfloor heating in the house as our 24×7 heating supply. Would that work with mini green houses to germinate? Any particular temperature to set the thermostat to?
Thanks for the great feedback and your idea. There’s no specific temperature. The warmer it is (to a point) the faster the germination. But that needs to be offset by the power inputs required. It’s not about the heat of the mat (or in your case floor) its the temperature of the potting mix that is important. Placing the pots in a clear plastic tub will help the potting mix to retain heat better (although make sure the tubs have good contact with the floor – avoid the tubs with wheels). This means the floor temperature can be lower and still have the same outcome as pots placed directly onto the floor.
Great article and experiment!
I was tossing up buying a heat pad, as I have been having germination issues the last couple of years in Central Victoria (Castlemaine area).
This year I nurtured those babies. I set them up in their pots/containers then put his in a Styrofoam box. I had them inside overnight in the laundry (although south side of the house) and during the day in the (small) greenhouse. The last few cold/wet says they have been on the floor near a north facing window.
It has taken about 2 weeks (some quicker), but have had about 90% germination of tomatoes, cucumbers , zucchinis and pumpkin. The ones that didn’t germinate were all from two types of seeds, so I think it is actually a seed viability issue.
We have floor based wood run hydronic heating (which is off now for the season), but will use this idea for next year, given your success with the fire.
For me the Styrofoam box has probably been a key enabler (and a key learning) in terms of regulating the temperate a bit more, and it helps when moving the seeds around.
I am a home brewer and use a belt belt and Inkbird temperature control to keep my brew at a steady desired temperature. I wonder if I used a heat belt wrapped around the seedling tray ??? It may overcome the issue of seedlings in the centre germinating faster than those on the perimeter – but then it may simply reverse the outcome. Heat belts cost as little as $15 each and the Inkbird (which is a great piece of digital kit, some are even wifi !) can be bought for $50. There is nothing stopping me from running a power board off the Inkbird with multiple heat belts, but obviously it would only read the temperature from one location where the probe was placed. Note that the cost of the heat belt and controller is less than half the cost of your kit and with the option of running several belts off the same controller much more flexible too. I’d like to give you test results but my heat belt is required for my beer. Priorities. It is also interesting that the optimal temperature for germinating tomatoes is the same as for fermenting beer.
Great idea. As long as the heat belt is water proof then it should be fine. In theory you could also run multiple units off the thermostat that I purchased. But again, there’s only one probe.
Thanks for running the experiment Duncan. It’s good to see the electricity consumption calculations.
This year we used a similar method to you, beside the wood heater in micro-greenhouses, then into tubs by the window. I’d call those tubs translucent though, rather than opaque.
Also regarding power meters, I bought four Meross smart plugs which, in addition to being able to program and turn on/off with a phone, they also log energy consumption. They only cost $65 for the four of them, so pretty cheap.
No worries, also we just raised another round it tomato seedlings by the wood heater, they germinated in less than three days – similar to our first round of seedlings.


Excellent experiment and results. Just wondering if the “next to the fireplace” method would work with electric panel heater? Sadly I don’t have a fireplace in my current residence.
Hi Linda,
Yes, any source of warmth that is consistent should do the trick.
Happy gardening!
Duncan
Very informative article. I’m based in Canberra, so cold climate also. We have underfloor heating in the house as our 24×7 heating supply. Would that work with mini green houses to germinate? Any particular temperature to set the thermostat to?
Hi Cynthia,
Thanks for the great feedback and your idea. There’s no specific temperature. The warmer it is (to a point) the faster the germination. But that needs to be offset by the power inputs required. It’s not about the heat of the mat (or in your case floor) its the temperature of the potting mix that is important. Placing the pots in a clear plastic tub will help the potting mix to retain heat better (although make sure the tubs have good contact with the floor – avoid the tubs with wheels). This means the floor temperature can be lower and still have the same outcome as pots placed directly onto the floor.
Good luck and happy gardening
Duncan
Great article and experiment!
I was tossing up buying a heat pad, as I have been having germination issues the last couple of years in Central Victoria (Castlemaine area).
This year I nurtured those babies. I set them up in their pots/containers then put his in a Styrofoam box. I had them inside overnight in the laundry (although south side of the house) and during the day in the (small) greenhouse. The last few cold/wet says they have been on the floor near a north facing window.
It has taken about 2 weeks (some quicker), but have had about 90% germination of tomatoes, cucumbers , zucchinis and pumpkin. The ones that didn’t germinate were all from two types of seeds, so I think it is actually a seed viability issue.
We have floor based wood run hydronic heating (which is off now for the season), but will use this idea for next year, given your success with the fire.
For me the Styrofoam box has probably been a key enabler (and a key learning) in terms of regulating the temperate a bit more, and it helps when moving the seeds around.
Hi Robyn,
Thanks for sharing your insights. I’m glad this post has inspired you to continue with a low-tech method next year!
Happy gardening!
Duncan
I am a home brewer and use a belt belt and Inkbird temperature control to keep my brew at a steady desired temperature. I wonder if I used a heat belt wrapped around the seedling tray ??? It may overcome the issue of seedlings in the centre germinating faster than those on the perimeter – but then it may simply reverse the outcome. Heat belts cost as little as $15 each and the Inkbird (which is a great piece of digital kit, some are even wifi !) can be bought for $50. There is nothing stopping me from running a power board off the Inkbird with multiple heat belts, but obviously it would only read the temperature from one location where the probe was placed. Note that the cost of the heat belt and controller is less than half the cost of your kit and with the option of running several belts off the same controller much more flexible too. I’d like to give you test results but my heat belt is required for my beer. Priorities. It is also interesting that the optimal temperature for germinating tomatoes is the same as for fermenting beer.
Hi Jamie,
Great idea. As long as the heat belt is water proof then it should be fine. In theory you could also run multiple units off the thermostat that I purchased. But again, there’s only one probe.
Thanks for sharing your wisdom.
Duncan
Thanks for running the experiment Duncan. It’s good to see the electricity consumption calculations.
This year we used a similar method to you, beside the wood heater in micro-greenhouses, then into tubs by the window. I’d call those tubs translucent though, rather than opaque.
Also regarding power meters, I bought four Meross smart plugs which, in addition to being able to program and turn on/off with a phone, they also log energy consumption. They only cost $65 for the four of them, so pretty cheap.
Gah…. indeed, translucent, not opaque. Thanks for pointing it out, I’ve updated the post accordingly.
Great tip on the Meross plugs. Thanks for sharing.
No worries, also we just raised another round it tomato seedlings by the wood heater, they germinated in less than three days – similar to our first round of seedlings.