Building the Giant Edible Trellis Frame
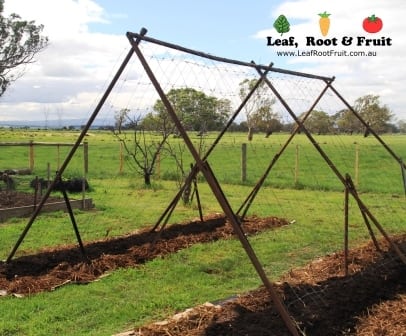
The Giant Edible Trellis Frame was made from steel pipe, re-claimed fencing mesh and star pickets
We built our trellis frame using old steel water pipe. We twitched it together with fencing wire and stabilised the three A-frames using star pickets. A final test that it would be strong enough, was to swing on each of the A-frames. We’re happy to report that this is strong and sturdy!
We then ran a series of fencing mesh across the top bar and anchored each end at the base with some large tent pegs. Our trellis measures as follows:
360cm wide at the base
465 cm long
250cm high
The trellis is big enough to easily walk through without bending over, and should accommodate a hammock or narrow table and chairs for a small children’s tea-party!
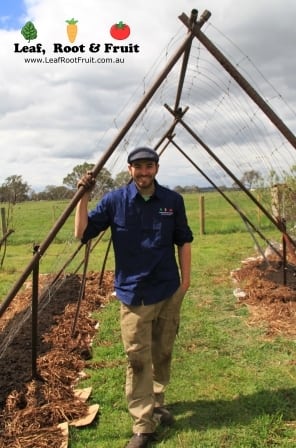
The Giant Edible Trellis is easily big enough to walk under without bending over
No-Dig Garden Beds
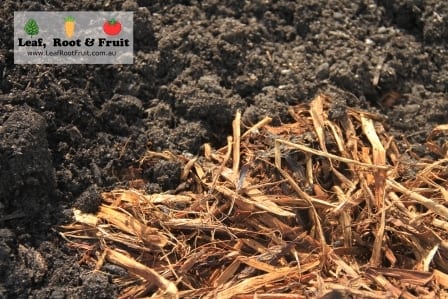
Our no-dig gardening materials included a layer of organic rich soil over a layer of rotted silage hay
To keep it as simple as possible, we used a very basic no-dig method for planting. First we trimmed the existing grass as short as possible. A layer of wet newspaper and cardboard was placed over this to smother the grass. We’ve got access to plenty of old silage bales made from oaten hay. These are so old, they’ve practically composted inside their plastic wrap. So we added a layer of this on top of the paper and cardboard. They’ll quickly break down over the coming weeks, supplying the plants with valuable nutrients. Finally we added a 10cm layer of a garden mix soil containing plenty of organic matter, compost and manure. Ideally your no-dig garden bed would have a few more layers, but the soil underneath is reasonable so we kept our no-dig bed quite shallow.
Seed Sowing Phase One
Phase one of seed sowing was planting out the legumes. These are fast growing, and able to be planted at this time of the year. The idea is that the beans and peas will fix nitrogen in the soil, making it available for the growth of the other plants. By planting these first, they should have a chance to grow up the trellis before the larger plants like the pumpkins and tromboncinos choke them out.
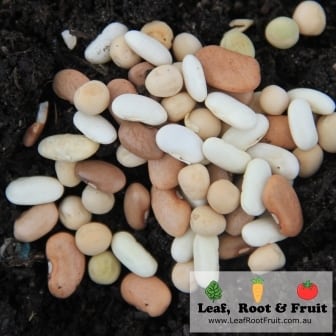
Phase one of planting included a legume mixture of runner beans and snow peas
The varieties of legumes we planted are as follows:
- Snow Pea, Melting Mammoth, a vigorous climber with tasty pods that are ideal in stir fries and salads.
- Climbing Bean, Blue Lake: a stringless bean, full of flavour
- Climbing Bean, Epicure: heavy crops over a long period
- Climbing Bean, Westralia: we haven’t grown these before, but apparently this variety is bred to suit Australian conditions, with white seeds and white flowers.
- Climbing Bean, Purple King: Has long flat purple pods that turn green when cooked. These will add some great colour to the trellis.
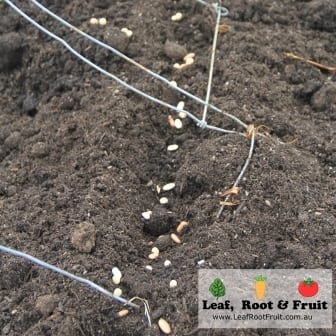
In keeping with the theme of mixed planting in a small space, We mixed all the beans and peas together and just dribbled them out into a shallow furrow in the soil. This way if one variety performs poorly, we wont be left with an empty space on the trellis. We spaced the seeds quite close together. We have had trouble with earwigs destroying young bean shoots in the past and by planting more seeds than we need we’ll have enough to survive and grow up the trellis. Once sown, we back-filled the furrow and watered in well. Unless the soil gets really dry, we won’t water these again until they germinate. Overly wet soil at this time of year can rot the beans and peas before they germinate.
Once the legumes have germinated and have a head start, we’ll start on phase two planting.
For more information on the inspiration behind this project and the rough plan, check out our original Giant Edible Trellis Project Blog Entry.